
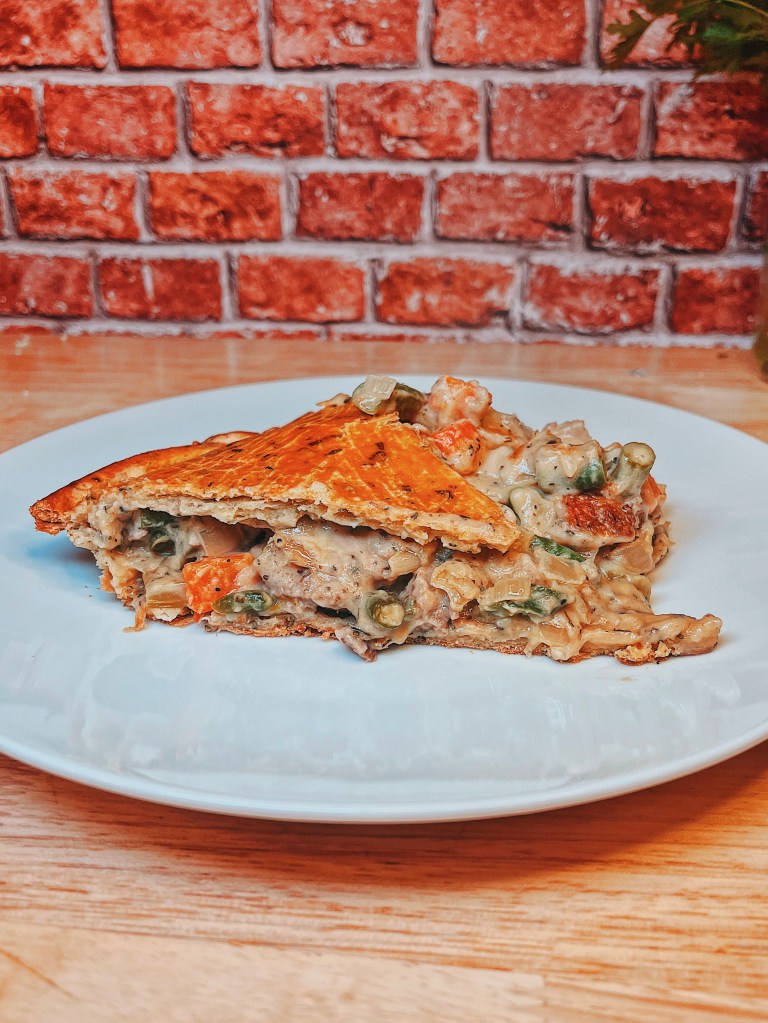
holiday pot pie
transform your leftovers into a cozy comfort
Tips
oh the pot pie possibilities
Thanksgiving is probably the biggest leftovers holiday. So much delicious food, but sometimes Don’t let those precious leftovers go to waste! This pot pie is a hearty, delicious way to use your leftovers. But hey, who says you need a holiday to enjoy a good pot pie? Let’s dive into this comforting concoction.
If you don’t have any leftovers, no worries! This recipe is super versatile. Just swap out the leftovers for fresh ingredients and customize it to your liking. It doesn’t matter if you’re a seasoned cook. Even kitchen newbies can handle this pot pie. It’s a surefire way to warm your belly and your heart.
Ingredients:
- Aromatics: Onion, celery, carrots (or whatever veggies you have on hand)
- Liquid: Milk, cream, or broth. I use a combination of all 3.
- Starch: Flour
- Protein: Leftover turkey, chicken, or ham. you can try other alternatives
- Veggies: Leftover green beans, corn, or peas. Fresh or frozen work just fine.
- Crust: Store-bought or try the pie crust below!
Let’s Cook!
- Sauté the Aromatics: First, let’s wake up your senses. Sauté those aromatics and veggies in some butter until they’re fragrant.
- Make a Roux: Sprinkle in some flour and cook it off with the veggies. Slowly whisk in your liquid (milk, cream, broth) to create a luscious sauce.
- Add Your Mix-Ins: Now, it’s time to party! Toss in your leftover turkey, veggies, or whatever other goodies you have. Let it all simmer together until heated through.
- Assemble: Pour the filling into a pie dish and top with your favorite pie crust. Seal the edges and cut a few vents for steam to escape.
- Bake to Perfection: Pop it in the oven and bake until the crust is golden brown and the filling is bubbly.
making ahead
Both the filling and the dough can be prepared in advance and stored before assembly. You can assemble the entire pie ahead of time. However, the bottom crust might become soggy if not baked right away. To avoid this, it’s best to chill both the dough and filling thoroughly before assembly.
Form the bottom crust in your desired pie dish. Wrap it in plastic. Chill it in the freezer for 20 minutes. Once it’s fully chilled, add the cold filling. Chilling all the ingredients prevents the butter from melting. It also stops the filling from seeping into the dough. This process ensures a crisp bottom crust. As Mary Berry famously advises, “No soggy bottoms.”
serving
Let the pie rest for 10 minutes before serving. This will allow the filling to set slightly. Use a large, sharp knife to cut into the pie, applying gentle pressure to break through the crust. The crust will be crispy! For easier serving, use a scoop to lift slices out. Be aware that the warm filling may ooze out. As the pie cools, the filling will continue to set.
Storage
You can store baked pot pie in a baked dish wrapped in foil. Alternatively, use an airtight container. It will last for 4 days in the refrigerator. Portions can be placed in the freezer, but this will introduce more liquid, and reheating may not produce expected results.
holiday pot pie
Preparation Time: 15 minutes | Cook Time: 45 minutes | Serving size: 4-6 people
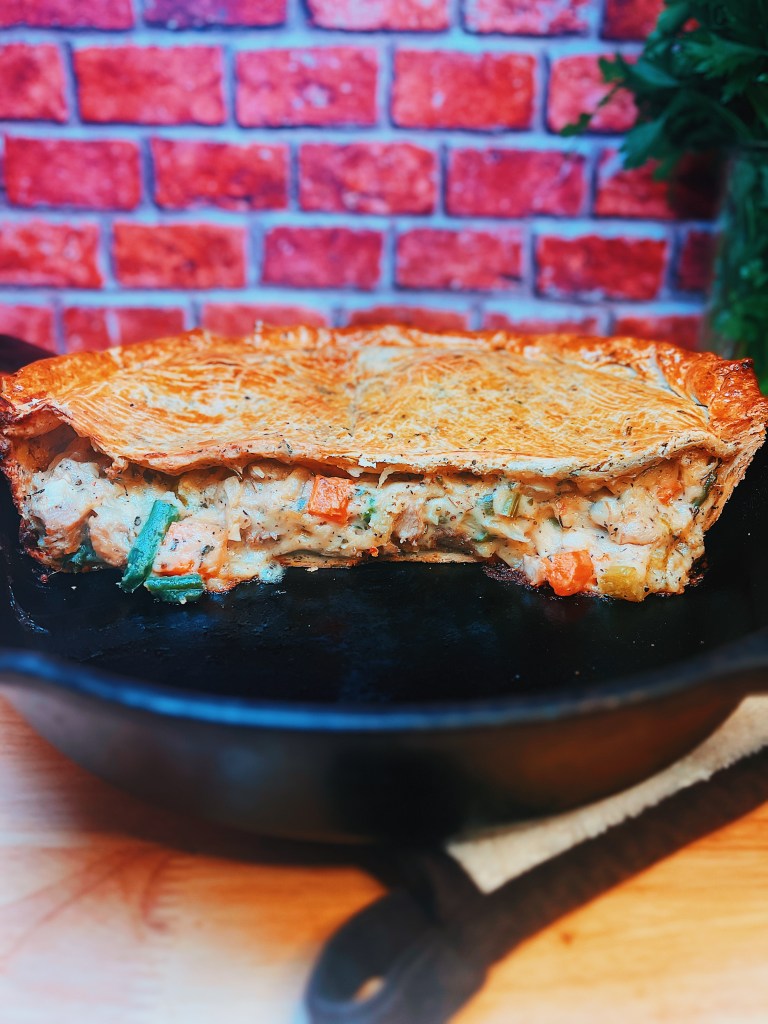
pot pie
herb pie crust
- 2 ½ cup all-purpose flour
- 2 teaspoon Salt
- ½ cup chopped herbs (use the leftovers from your meal!)
- 1 teaspoon granulated sugar
- 1 cup unsalted butter, very cold
- 8-12 tablespoon ice water
filling
- 4 tablespoon butter
- 1 large yellow onions; chopped
- 5 cloves, garlic, chopped
- ½ cup celery; raw, chopped
- ½ cup carrots; raw, cubed
- 4 tablespoon flour
- 2 tablespoons fresh chopped herbs (I used leftover sage rosemary and thyme, feel free to use more if you have them!)
- 1 cup; milk
- 1 cup; heavy cream
- 1 cup; chicken or vegetable broth
- 1 cup leftover mashed potatoes (i packed my cups)
- 2 – 3 cups turkey Meat, removed from bone and chopped up
- 1 cup leftover green beans (plain or casserole works!)
- 1 tablespoon herbs de provence (2 if you didn’t use fresh herbs)
- 1 ½ teaspoon bouillon seasoning
- Salt and pepper
- 1 egg yolk
Follow
make the dough
- In a large bowl, add flour, salt, herbs and sugar.
- Using the large holes on your grater, grate cold butter into the dry ingredients.
- Massage the butter into the flour mixture by gently pressing the mixture between your fingers. (Feel free to use a pastry cutter if you have it.)
- Add the cold water to the mixture and combine with a spoon or rubber spatula. (I add 8 tablespoons of water to start and do a tablespoon at a time until the flour comes together. The flour should be able to hold together in a ball. Once this happens, stop adding water.)
- Break off ⅓ of the dough (this will serve as the topper; the remaining ⅔ will be the base). Ball both sets of dough and wrap tightly in plastic wrap. Let them rest in the fridge. (This is a good time to make the filling.) The dough can be stored in the fridge for up to 3 days. To store in the freezer for up to 2 weeks, wrap in plastic wrap and place in an airtight container.
Make the filling
- In a large pot, heat the butter over medium heat. Once the butter is melted, add onions, garlic, celery and carrots. Season with salt and pepper, and cook until fragrant, about 6 to 8 minutes.
- Sprinkle flour and fresh herbs, and cook for an additional minute. Make sure there are no dry spots.
- Pour in the heavy cream, milk and broth, and whisk; be sure to scrap the bottom. Keep heat at medium and bring to a simmer. Cook for 4 to 6 minutes, stirring occasionally, until it begins to thicken. (Don’t let the mixture scald.)
- Add mashed potatoes and whisk until combined. Add in meat, green beans, herbs de provence and bouillon, and season with salt and pepper to taste.
- Remove from heat and let cool while you finish preparing the dough.
assemble
- Note: I recommend taking the frozen dough out about an hour before using. Take the refrigerated dough out at least 30 minutes before.
- Place an oven rack in the second spot from the bottom. Preheat to 425 degrees.
- Get your baking dish (I used a 10-inch cast iron skillet). Before you begin to roll out the dough, be sure it is at room temperature and malleable. (If it’s not thawed, it will break apart as you roll it.)
- Take the larger ball of dough and place it on a lightly floured surface. Press into a thick disk. Sprinkle the top with flour and begin rolling the disk into a 12-inch circle. (This is dependent on the size of your dish; you want at least a 1-inch overhang.)
- Gently place the dough into the dish. Using your knuckles, press the dough into the edges of the pan. Allow an overhang. Loosely cover the dish in plastic wrap and place in the freezer. Roll out the topper dough, while you wait for your filling to cool.
- Take the other dough ball and roll to 10 to 11 inches (again depending on your dish size).
- Remove the dish from the freezer and fill with the filling. Make sure you do not fill directly to the line. Brush the dough line with water before putting on the topper.
- Place the top crust over the dish and press down around the dish edge. (Because I used a cast iron skillet, I did not have a rim like a pie dish; therefore, I folded the overhang and tucked it.)
- Brush the top of the dough generously with the egg yolk. Score the dough to allow venting. Bake for a total of 35 to 45 minutes: Bake for the first 20 minutes uncovered, and then cover with foil or a pie protector to finish baking until golden brown and flakey.
- Remove from the oven and let cool before serving. Scoop a hardy spoonful and enjoy Thanksgiving renewed!

Leave a comment